A Boys’ Bathroom Design to last from Toddler to Teen
After 4 years of not using this bathroom, and almost 5 months of renovating it, we finally have a functional, proper, boys’ bathroom! I can’t wait to share all the details, but I know you really just want the pictures! I talk a lot about the design direction and decisions I made in planning in this design plan blog post, if you want more details on the backstory. As with any renovation (or project I design) things change and evolve during the actual implementation (looking at you, wallpaper). So it is fun to compare the original design plan to where I ended up.
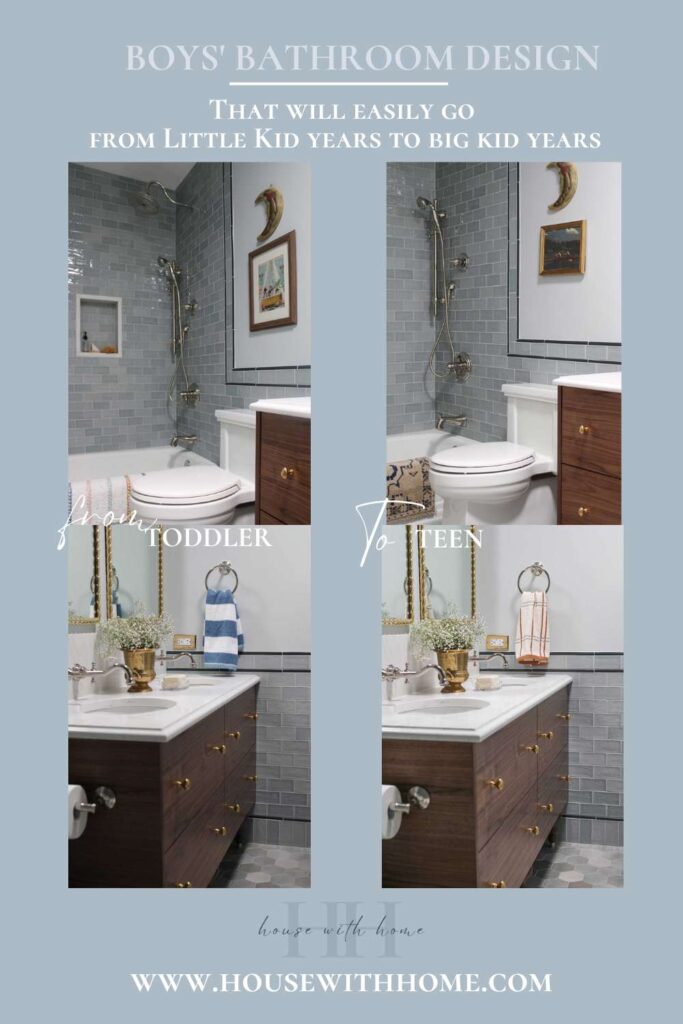
Also, stick with me until the end where I share how I visualized this bathroom transitioning from little a boys’ bathroom to a teen boys’ bathroom. Just a few accessory swaps and the whole room goes from playful to tailored. Hopefully this reveal can give you some great boys bathroom ideas.
This post may contain product links that may contain affiliate links. When you use the link to make a purchase, I may make a small commission. This is not an additional cost for you, but helps me to produce this blog and content for you to enjoy. My full disclosure is here. Thank you!
Tile Decisions for a Boys’ Bathroom
The design for this bathroom took me several years to settle on, mostly because I couldn’t find a tile that I felt checked all the boxes of what I wanted. Something that felt classic. Tile that was medium scale for the tile floors so I didn’t spend the next 18 years cleaning grout on the bathroom floor (potty training boys). AND something that had a specialness feel to it. When I stumbled on this tile I instantly knew the direction I was going with the room. I wrote more about the tile decision in this post.
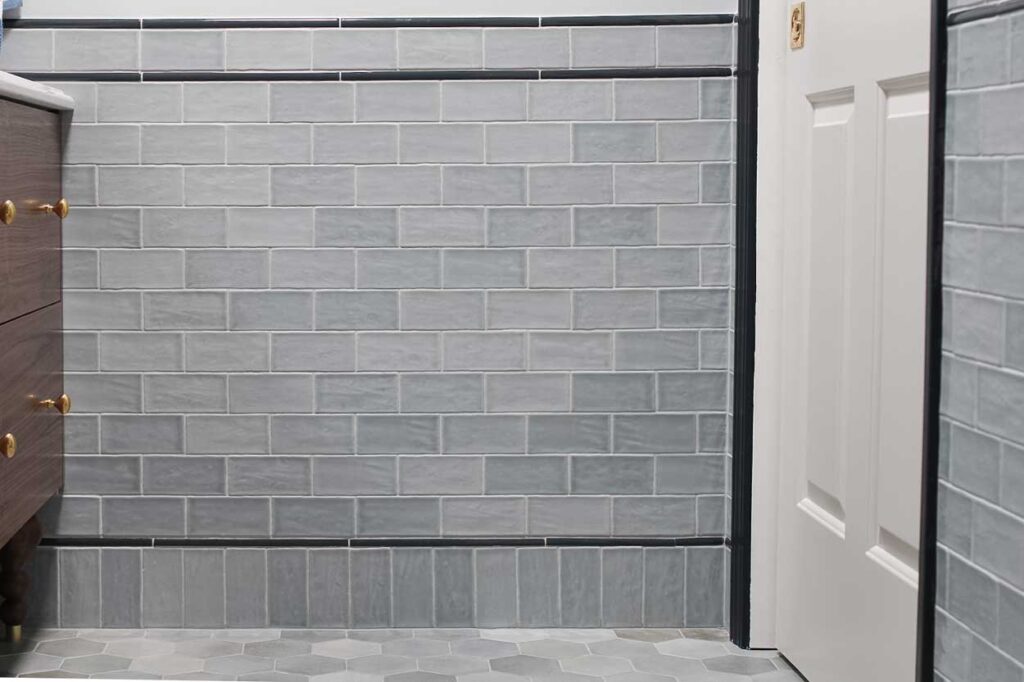
My favorite part of the tile design is how making a few changes to how these affordable tiles were installed, really changed the whole look. Changing the tile orientation to a soldier row along the floor, using a pencil till border, and doing a tone on tone grout look with the floor tile.
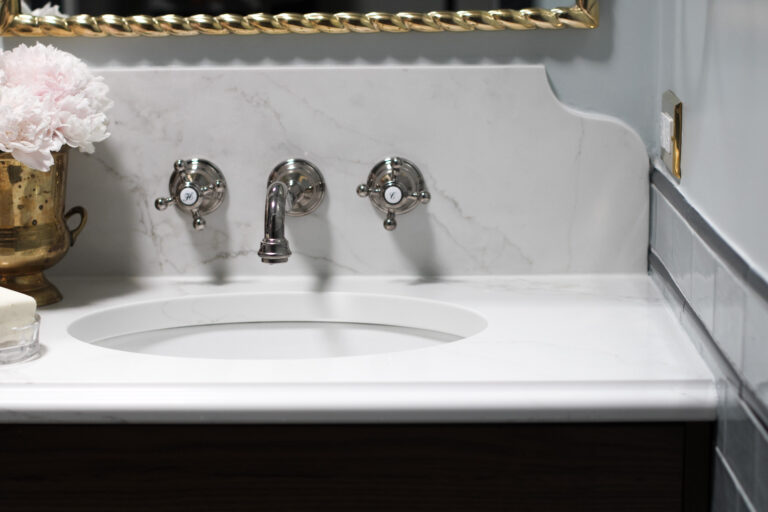
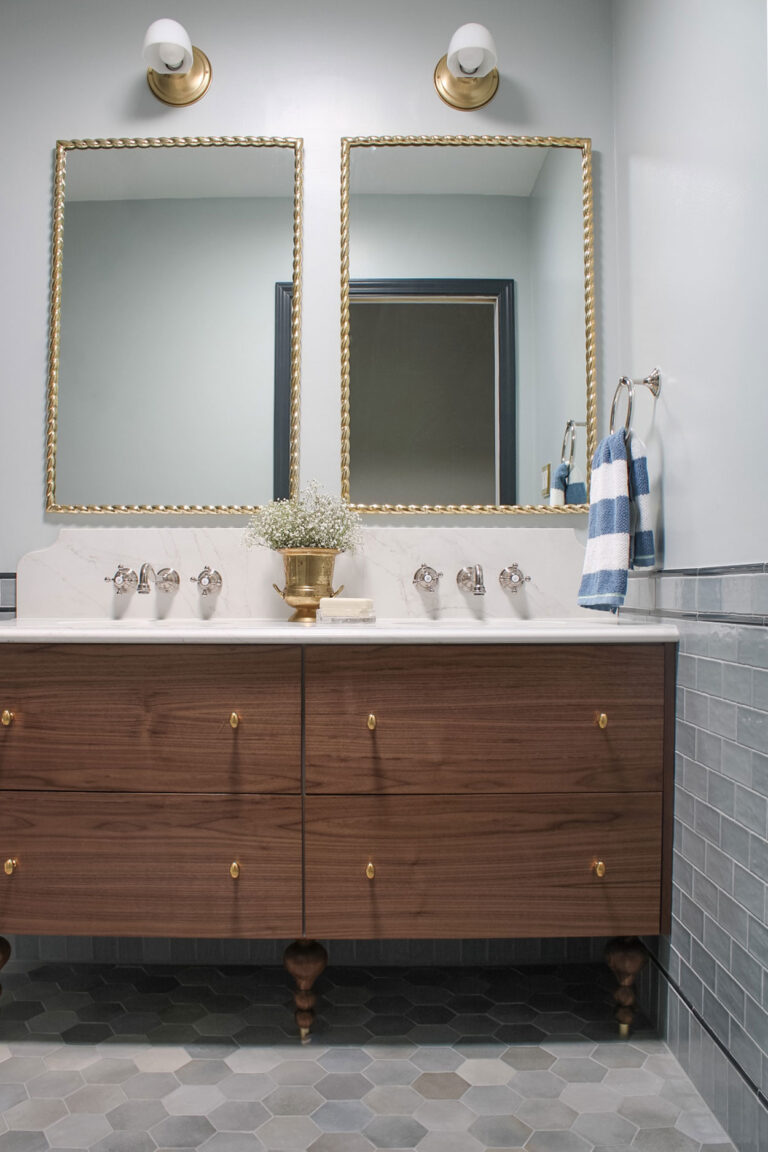
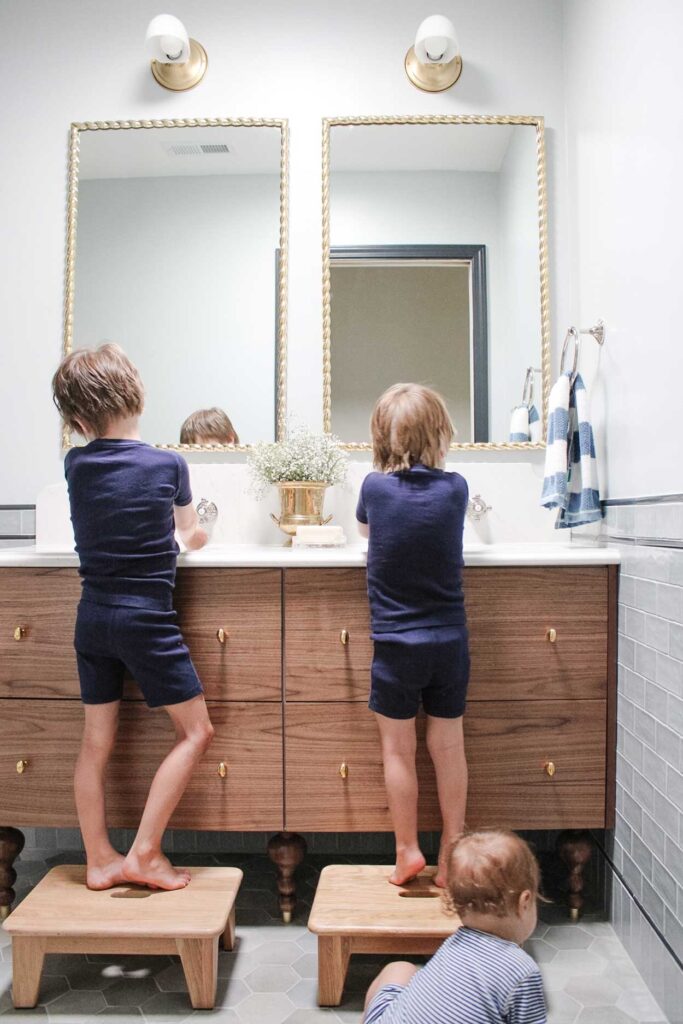
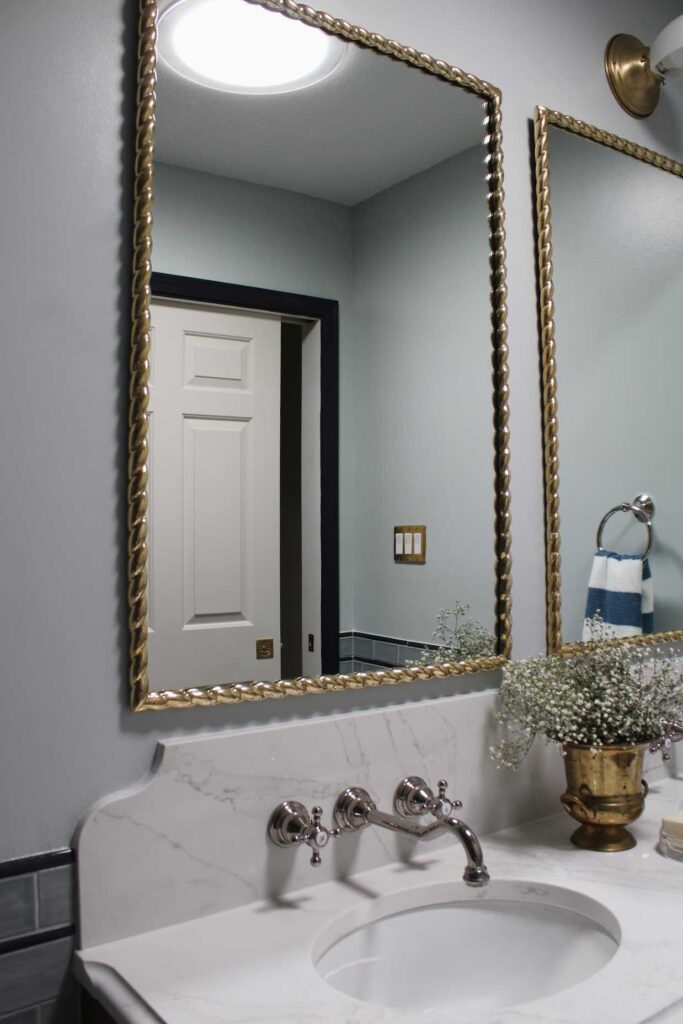
The Vanity Wall
The vanity area was really the focal point of the entire room. When the new pocket door is open (which it is most of the time) this wall is what you see from the hallway. For this reason it got the majority of the design attention and several unique little details.
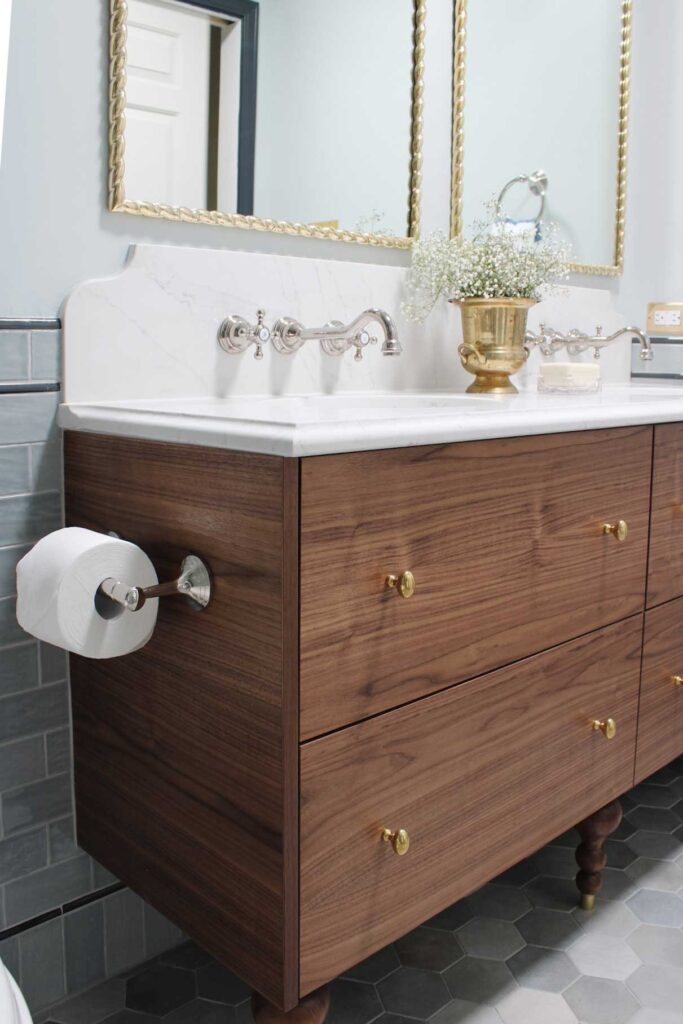
A Custom Vanity Design (that is actually a hack)
The vanity was the pivotal change this room needed. I needed to free up as much floor space as possible, so a narrow vanity was necessary. This really limited me to either having something custom built or hacking something pre-existing. This Ikea godmorgon hack vanity gave me the narrow footprint, the open space to store step stools with easy access, and the ability to give it a facelift and customize it aesthetically. I could not be happier with the design, function, and overall price point that this vanity came out to.
One of my favorite features are the 4 large drawers that will provide plenty of storage space. The linen closet is actually in the hallway outside of this bathroom. So having these functional drawers for bath toys and towels right in the bathroom will be great for our young boys.

I wrote all about the details to how we built this custom vanity using an Ikea godmorgon hack (post coming soon)!
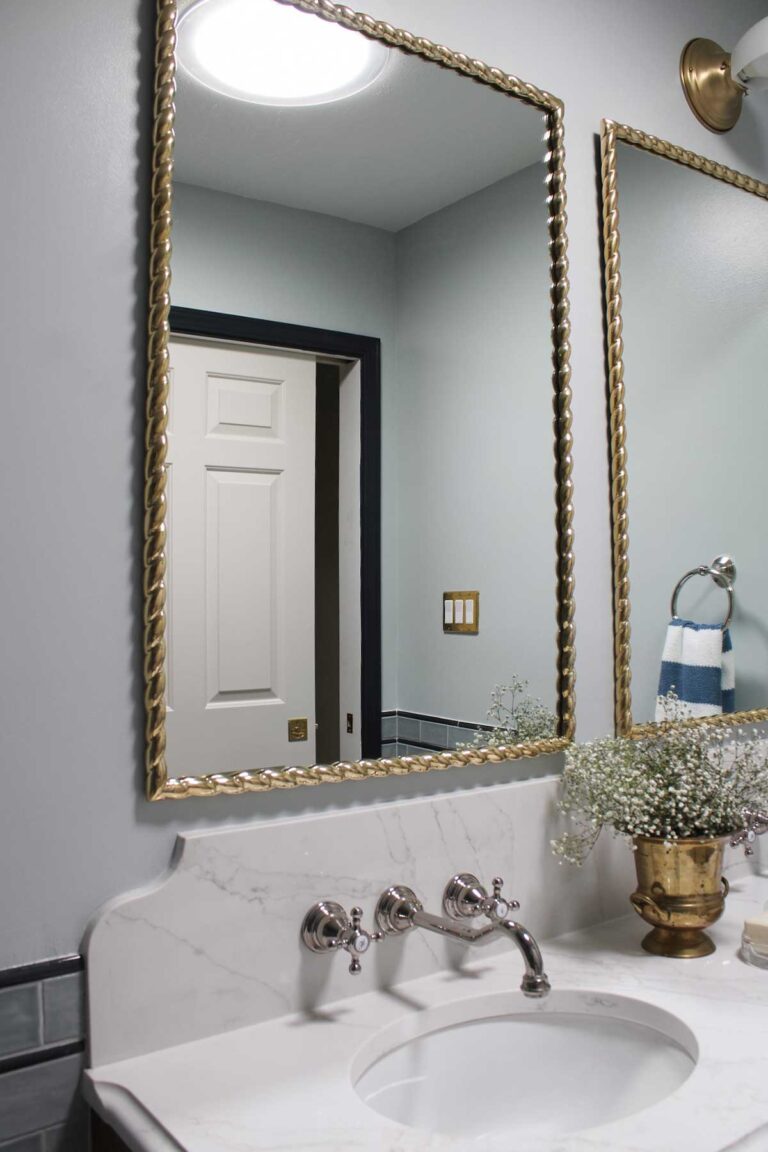
Mirrors & Light Fixtures
The mirrors were the big statement and investment piece of the room. The finish is unlacquered brass, which will patina over time. I really love the rope look to them, feeling masculine in a nautical way, but also a little feminine like beautiful jewelry. For the lighting, I wanted something understated. The simple brass fixture and the opal glass shades have the perfect vintage touch that the room needed.
Metal Finishes in the Boys’ Bathroom
My entire home mixes polished nickel and brass (typically unlacquered or aged) so this room was no exception. I started by sourcing the tub and shower set since it had the most complicated set of constraints. Once I settled on this set in polished nickel, I wanted to tie in the sink hardware, having it be polished nickel as well.

Then I followed my usual formula of making sure each view point has a mix of both metals, and that each finish is represented at least 2 times (ideally 3) in the room. This gives a more cohesive look to the bathroom, but also makes it feel layered and interesting as compared to if only one metal, or wood finish, or color were used.
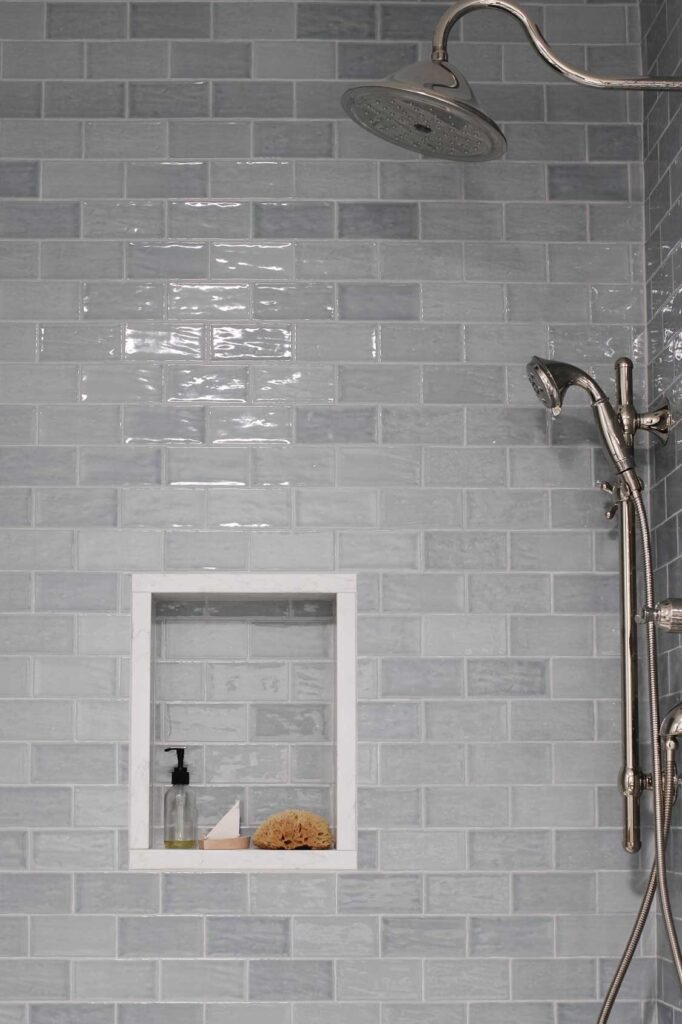
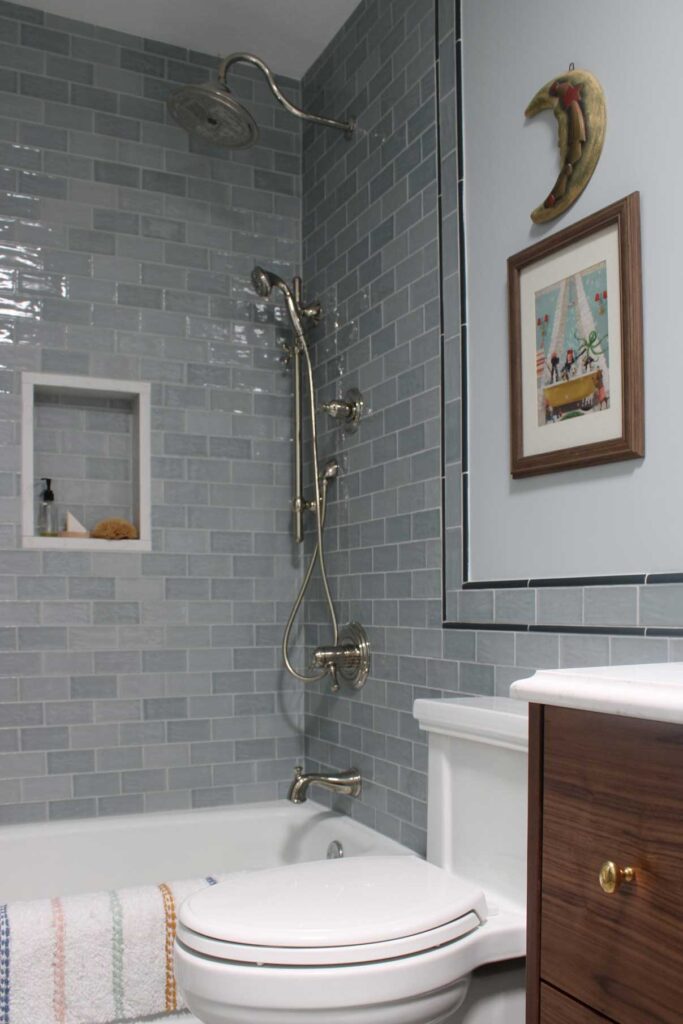
The Bathtub and Shower Area
I decided to keep the bathroom’s original cast iron tub, since it was in great condition. Removing the old caulk, adding the new bathroom tile surround, and installing a new shower head and shower faucets brought it back to life. This was a great way to save money on the renovation and to help reduce the overall waste associated with a renovation project.
Plumbing Fixtures
For the shower and bathtub, I wanted a middle range price point. Plumbing fixtures can get really expensive, and some expensive ones caught my eye as they are works of art. I also needed a hand sprayer, wanted a classic style, needed it to be available in a 3 month time frame, and wanted it in either a aged or unlacquered brass or polished nickel. I spent a lot time trying to “check all of the boxes” and ultimately felt this set I chose gave me what I was looking for. Something to keep in mind when shopping for plumbing, is making sure the rough-in valves are included or to purchase them if not. Also, having a good understanding of basic fixture knowledge so you can be sure to get the correct diverters for what you need.

The Tub & Shower Tile
I wanted to keep this area simple, but give it a few areas of interest. I intentionally designed the tile border to extend outside of width of the tub. This allowed the shower curtain to be installed inside the border detail so that this tile work shows when the curtain is closed. It also adds a little extra protection from water around the shower wall areas.
The Shower Curtain vs Shower Glass Decisions
Speaking of shower curtains, I was adamant against installing glass doors in here. Actually, at one point for a previous owner this tub had a glass shower partition, as the residue was visible on the tub. However, with this bathroom being so small and with the toilet’s unfortunate location, I did not want to have to squeeze around glass to bathe toddlers. I do anticipate considering the addition of it when they get older and are primarily shower takers. And have learned how to clean the glass themselves.
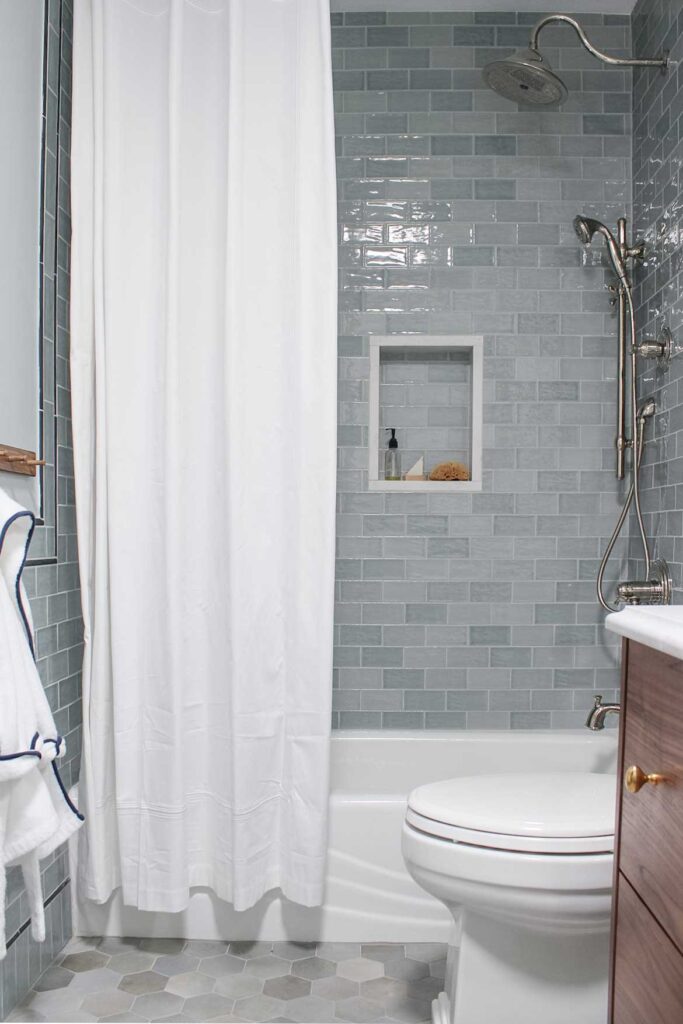
I love a curved shower curtain because it adds a little more space in the shower, making it feel just a touch more luxurious. The curtain rod is installed up high, at approximately 87″ to help elongate the height of the room. I then used an extra long shower curtain and liner. Personally, I prefer the look of a shower curtain barely kissing the floor, similar to how curtains are hung. However, with 3 little boys and the proximity of the toilet, practicality won in this design element. (If you are a mom of little boys, you understand why this is a problem). I left around 3″ of space between the bottom of the curtain and the floor.
The Shower Niche Detail
My favorite detail in the tub shower area is the shower niche details. I had the quartz I used for the bathroom vanity countertop top fabricated to wrap the inside of the niche. Practically, I love the idea that there is less grout to remove soap scum from, as this is an area I find gets really grimy in a bathroom. Aesthetically, I love the interest it adds and how it ties the room together (back to my formula of repeating finishes).
The Best toilet for a boys’ bathroom
Yes, I am about to write an entire section about a toilet. But this is one of the best decisions I made for the room. Which is a good thing because I spent an embarrassing number of hours researching the best toilets. And this one I selected was also a higher price point than I wanted to be at. But, I am here to say it was completely worth it.
I wanted a one piece skirted toilet that was easy to clean because the bathroom habits of newly potty trained children create a lot of extra cleaning as it is. I also wanted something with traditional details to it. Why do so many toilets look like little space ships now? Truthfully, my boys probably would have appreciated that. I also needed something that had a small footprint, because every inch counts in a small bathroom. Especially when the toilet is in a bad location to start with.
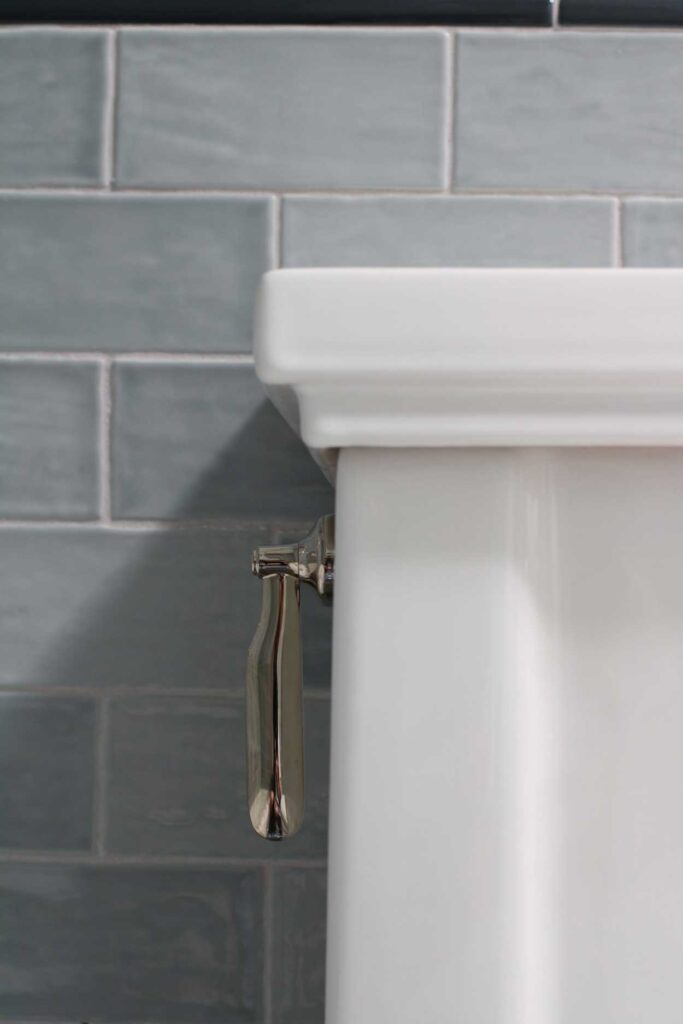
Once installed this exceeded my expectations. I love how the tank sits completely flush against the wall, leaving no awkward gap that is impossible to clean. It is great for tight spaces. For a toilet, it’s also pretty sharp looking. For a bathroom like this one, where the toilet is unfortunately a front and center feature, I think it is worth it to spend a little more to get one that is nice looking, too. That is also how I justified changing the flush lever to this polished nickel one. One other tip for a bathroom with younger children is to install a double post toilet paper holder. Otherwise they will inevitably remove the roll of toilet paper from the holder every time they are in the bathroom. Whether they accidentally pull the roll of or because they are insatiably curious, I promise this is a design decision that will save you a future headache.
How to Make the Bathroom Feel more Spacious
More square footage…without changing the layout! Besides adding a narrower vanity, saving us around 4″, these two changes drastically opened up the room. Both things we hired out, but were completely worth it.
Adding a Pocket Door
Overall, adding a pocket door was a surprisingly easy and affordable part of the renovation. It freed up significant dead space where the original swing door swung into the bathroom in front of one of the sinks. This single change allowed us to utilize so much more of the rooms floor space. Something that was really needed for a boy’ bathroom shared by 3 little guys that will eventually grow into 3 big guys and need every inch of space.
Adding a Sun Tunnel
Installing a sun tunnel was almost removed from the project several times. I originally had my heart set on a skylight and was not convinced a sun tunnel would give me the light I wanted. I was stunned by how much natural light it added. Truly, there is no better light than overhead sunlight. It made the entire bathroom feel so much more grand. This one change made a huge difference in the overall feeling of the room.
I will share more about the sun tunnel details in this blog post ((post coming soon)!.
The Wallpaper Decision
I originally shared in my design plan that this room would be getting this charming blue plaid wallpaper. I even purchased it and all of the supplies to install it. But, in the end practicality one out on this one. I decided that this bathroom was so small, poorly ventilated, and will be used by boys who probably will forget to turn on the exhaust fan. I didn’t want to worry about wallpaper seams coming up and mildew growing under the paper. So this wallpaper may get installed in our powder bathroom or another big boy room. I did a beautiful wallpaper in one of my son’s room and love it so much.

The evolution of the Boys’ Bathroom
I thought it would be fun to share a series of photos showing the bathroom before. Then the bathroom currently, styled for little boys. Since I designed this bathroom to grow with them, I went ahead and swapped a few accessories to imagine it transitioning to a teen or even adult guest bathroom for the future. I also think it would be so charming with a pale pink painted upper half for a girls bathroom.
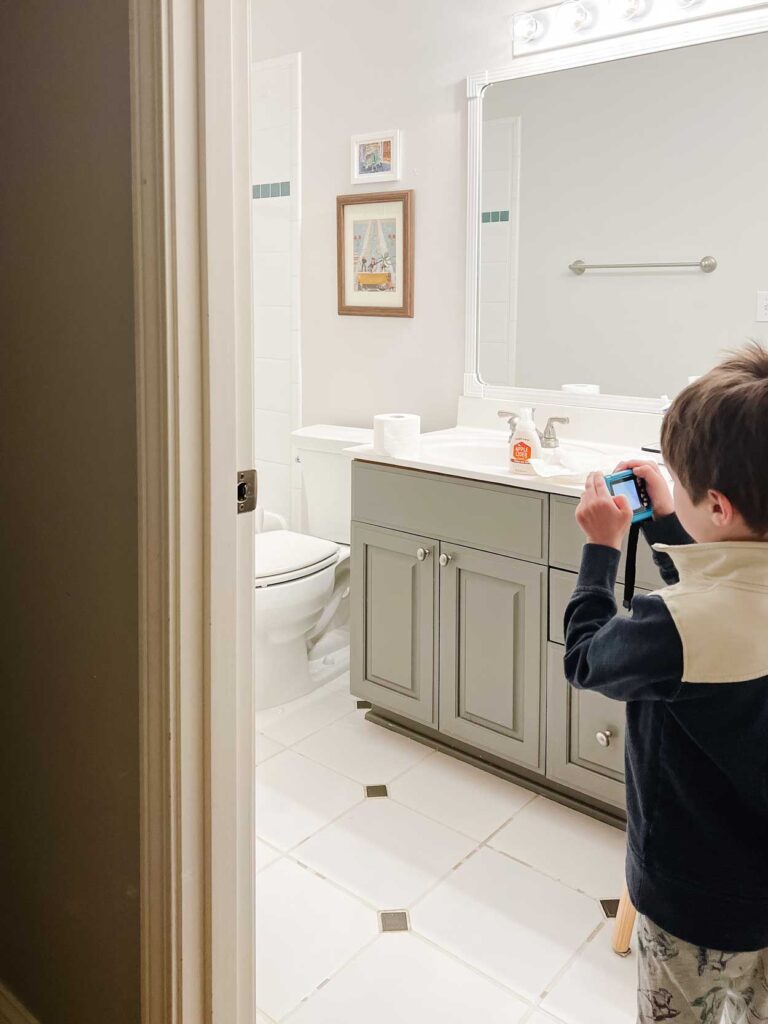
The Before of the Boys’ Bathroom
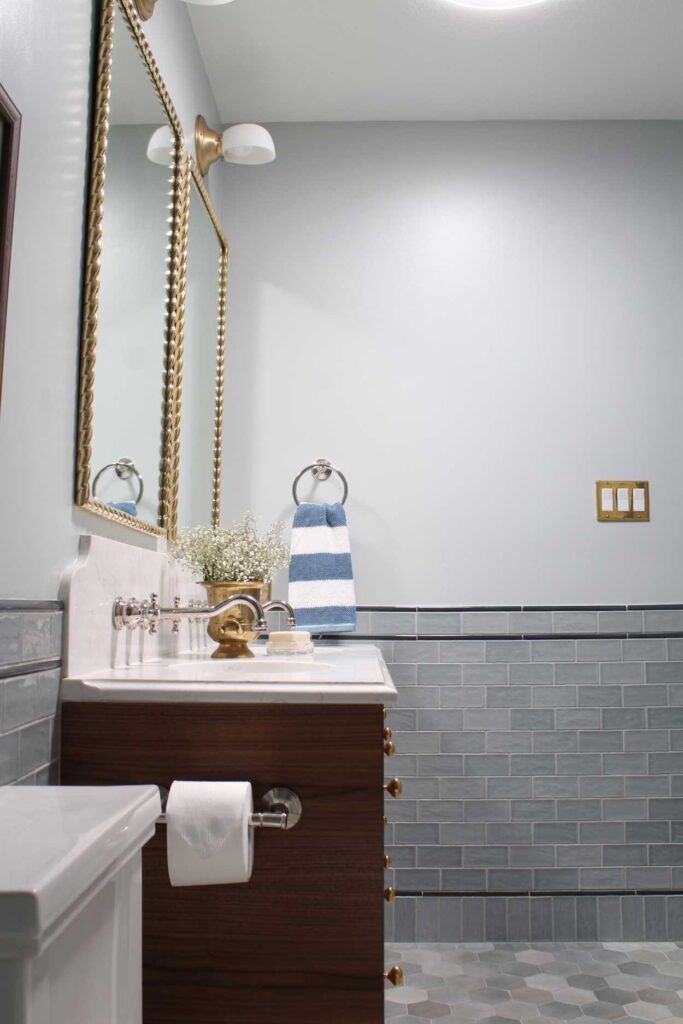
The Current Little Boys’ Bathroom
The foundational blue color palette is the perfect backdrop for a kid’s bathroom. Adding in a few bright colors in the artwork, bath mat, and towels help to create a color scheme that feels youthful and fun. I love the whimsical theme of this art, and brought it back into the bathroom. It has hung in our kid’s bathroom since my oldest son was a baby and he requested it remain a part of the bathroom decor. A few small additions really bring in a more playful look.
The Future Teen Boys’ Bathroom
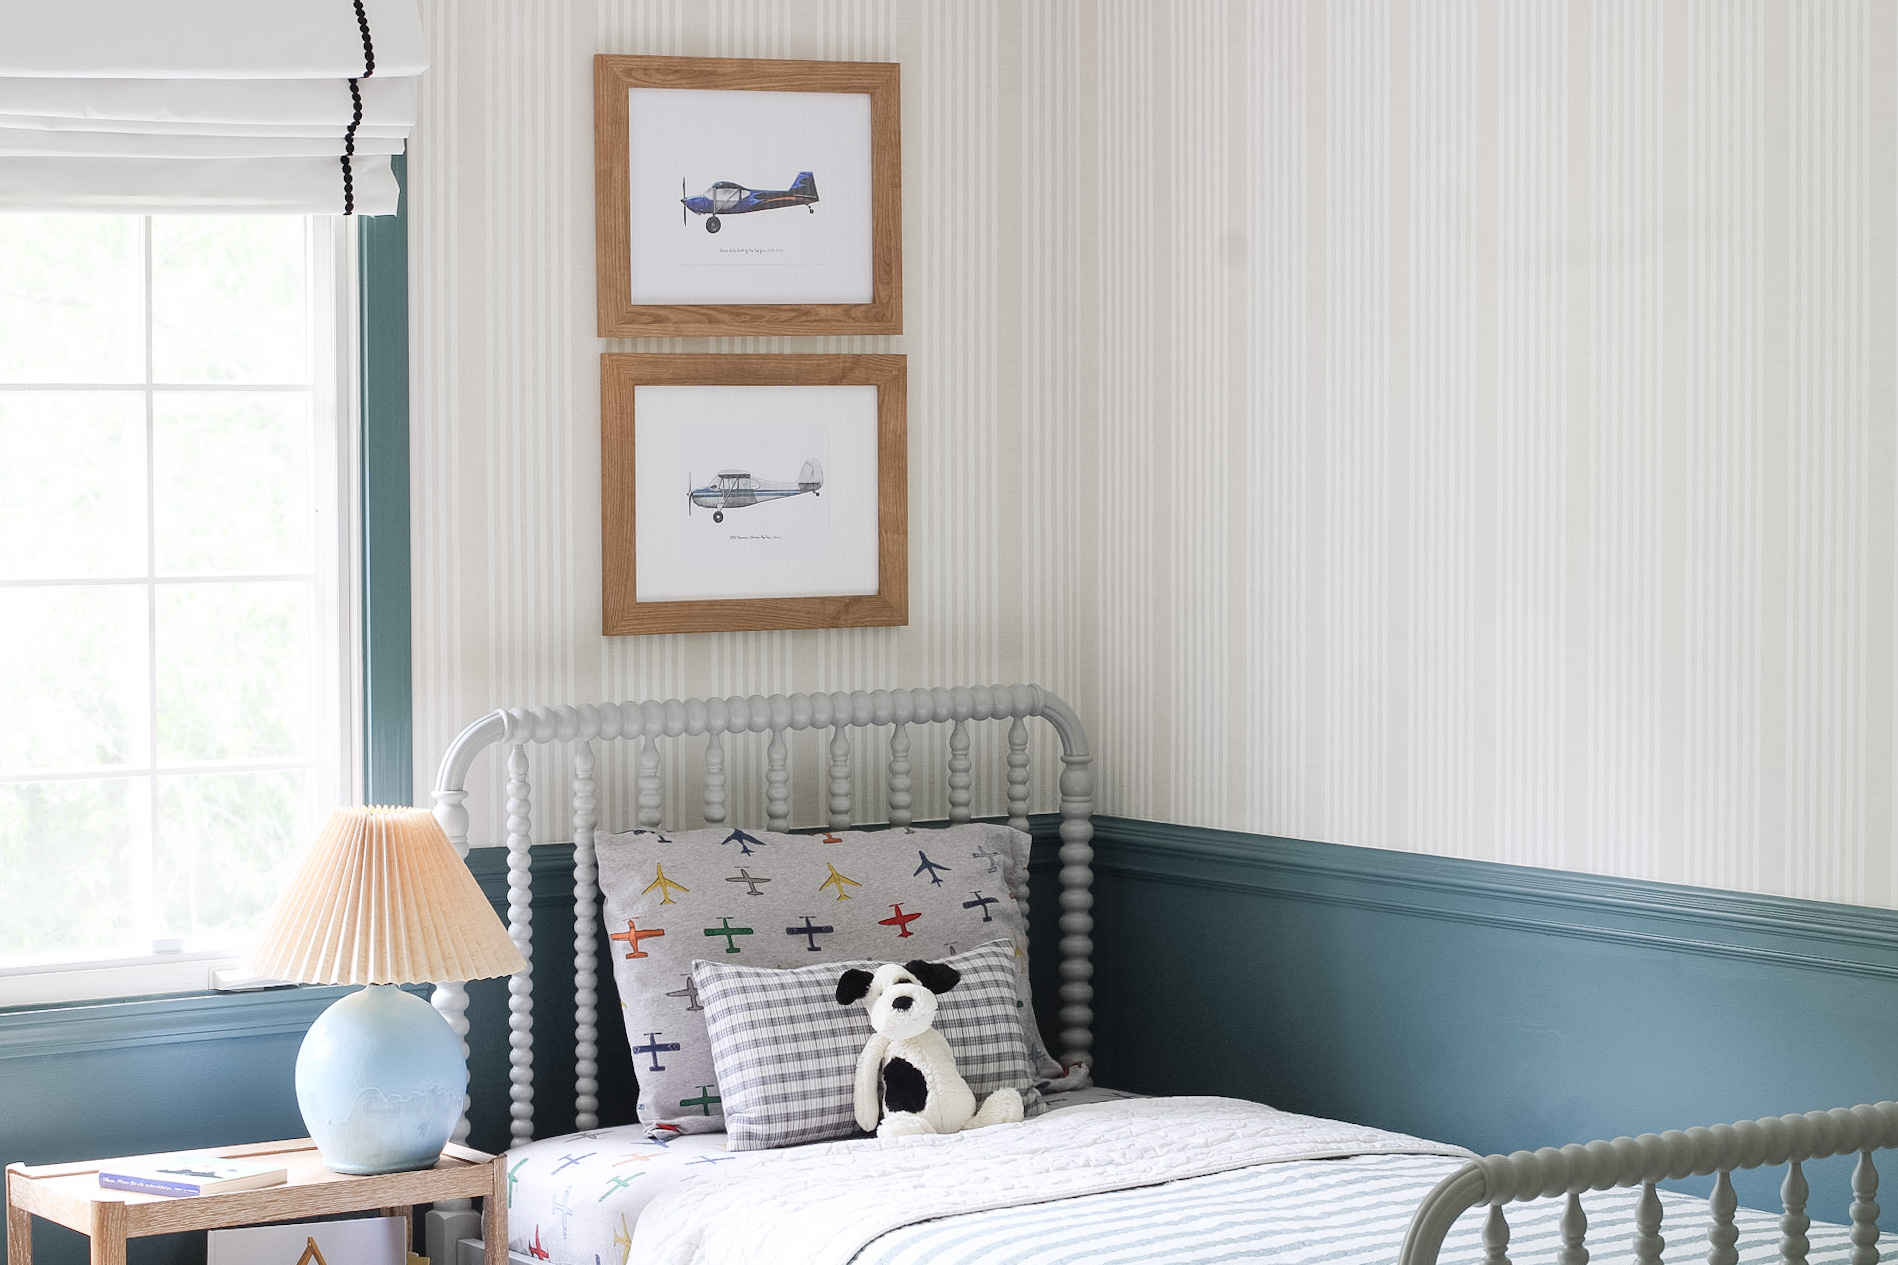
As the boys grow older, I can swap out the art to something a little more mature. Shifting the existing color scheme in the towels and art will be a great way to change the overall vibe of the boys’ bathroom. This is the same principle I used when designing my son’s classic airplane bedroom.
Boys’ Bathroom Sources
This has truly been one of my favorite home projects yet. It really stretched my design skills, coming up with something timeless and unique. Something that could support a few whimsical elements now for my younger boys and mature with them when they are teenage boys

Boys’ Bathroom Sources
- Wall Paint Color: Farrow & Ball No. 205 Skylight mixed in Valspar Paint, Satin
- Door Paint Color: Sherwin Williams Limewash
- Quartz Countertops – Vadara Quartz Sterling Light
- Ikea Godmorgon Vanity (this is a different size than mine. It was discontinued in the size 55 1/8″ size I used)
- Walnut Vanity Fronts
- Wall Faucets
- Undermount Sinks
- Vanity Legs
- Mirrors
- Vanity Lights
- Drawer Hardware
- Pocket Door Hardware ( unlacquered brass)
- Towel Ring (polished nickel)
- Towels: Blue Stripe, Plaid
- Floor Tile
- Wall Tile: Blue Subway, Midnight Blue Pencil Trim Tile
- Offset Drain for Sink Plumbing
- Shower (polished nickel)
- Shower Curtain Rod (polished nickel)
- Shower Curtain
- Bath Mat
- Art
- Toilet Paper Holder (polished nickel)
- Toilet + Polished Nickel Lever
- Peg Rail ( I stained these dark walnut + clear coat sealed them)
- LIttle Kid’s Bathrobes
- sun tunnel