Before & After: Kitchen Renovation using Ikea Cabinets
I am finally getting the time to share all the details of our Ikea Kitchen renovation using Ikea Cabinets. All of the sources and details that you have been asking for, are hopefully in here. If you have followed along on Instagram (hi, friends!) you probably know a little bit about this story. But if not, here is the synopsis. We bought this house, I designed the entire kitchen renovation BEFORE it closed, then we immediately renovated the kitchen and family room. This was our dream neighborhood and the only home in our price range that was listed all year. I loved so much about it. It wasn’t too big – some of the homes in our neighborhood had way too many bathrooms to clean. There was a screened-in porch that overlooked a large and relatively private backyard. It had an open main floor, with exception of the kitchen. It was built in the mid-90’s and it was ready for a few updates, which I secretly was not upset about. I really wanted a main living space that worked for our family, while growing my talents at designing and managing a kitchen renovation. I couldn’t have been happier to tackle this update and create a space that was beautiful, functional, and budget-conscious. Nearly a year later, it has exceeded what I hoped for how our family would grow and live in this space. It truly has become the center of how we gather every single day.

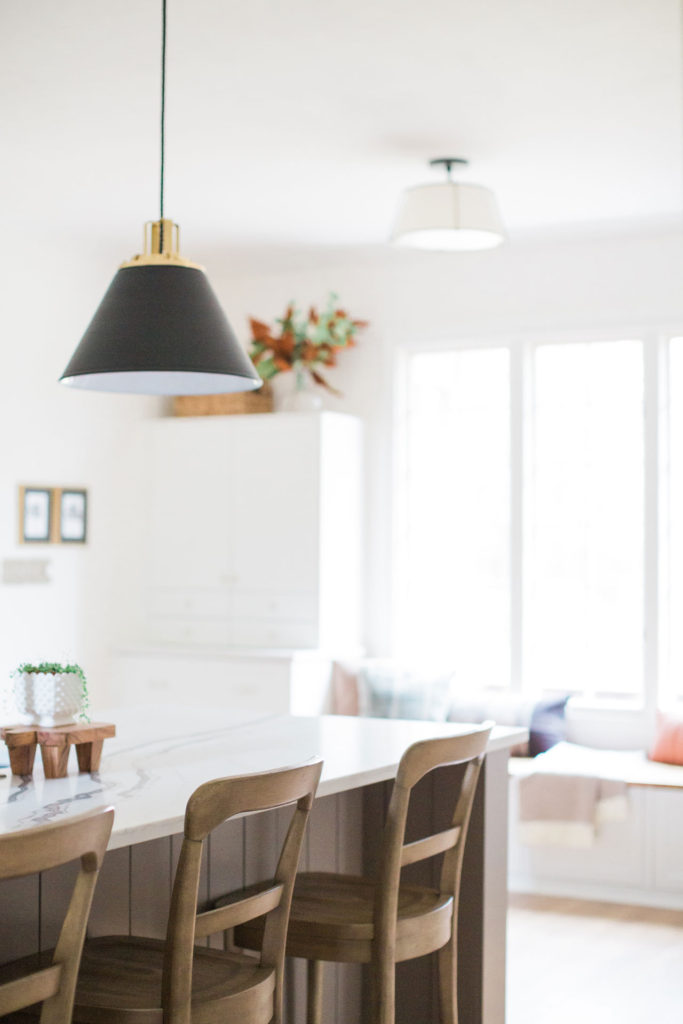
pendant lights | perimeter cabinets shaker in supermatte white | island cabinets shaker in supermatte light grey | cabinet hardware (polished nickel) | barstools | backsplash tile | Sink Faucet | outlet and switch cover plates (polished nickel) | sink
We moved into the house for 2.5 weeks, then moved out to my in-laws for 3 months, so the renovation could begin. During this time we had a 16 month old and I was insanely sick from being pregnant myself. So documenting the process fell to the way-side. I tried to avoid the dust and smells of the demo and was not in a mental or physical place to make taking pictures a priority. Although, I regret that now that I am sharing it with all of you. I was struggling with what the most important take away I wanted to share in this post. As it turns out, the majority of questions I have received have been about the overall process using Ikea cabinets and Semihandmade cabinet fronts. So I am going to break this post down in chronological order of how we installed and what and why I chose the selections for this space. I am really proud of the renovation I designed, managed, and watched my husband build. However, it is nothing to sugarcoat. It was a rough several months. But if you are looking to renovate your kitchen and have the ability and skills to DIY some of it, follow along. This post is full of the details on how we went about doing our DIY Ikea Kitchen. And if you are just curious or looking for inspiration, keep reading!
I was struggling with what the most important take away I wanted to share in this post. As it turns out, the majority of questions I have received have been about the overall process and the Ikea and Semihandmade cabinet component. So I am going to break this post down in chronological order of how we installed and what and why I chose the selections for this space. I am really proud of the renovation I designed, managed, and watched my husband build. However, it is nothing to sugarcoat. It was a rough several months. But if you are looking to renovate your kitchen and have the ability and skills to DIY some of it, follow along. This post is full of the details on how we went about doing our DIY Ikea Kitchen. And if you are just curious or looking for inspiration, keep reading!I was struggling with what the most important take away I wanted to share in this post. As it turns out, the majority of questions I have received have been about the overall process and the Ikea and Semihandmade cabinet component. So I am going to break this post down in chronological order of how we installed and what and why I chose the selections for this space. I am really proud of the renovation I designed, managed, and watched my husband build. However, it is nothing to sugarcoat. It was a rough several months. But if you are looking to renovate your kitchen and have the ability and skills to DIY some of it, follow along. This post is full of the details on how we went about doing our DIY Ikea Kitchen. And if you are just curious or looking for inspiration, keep reading!
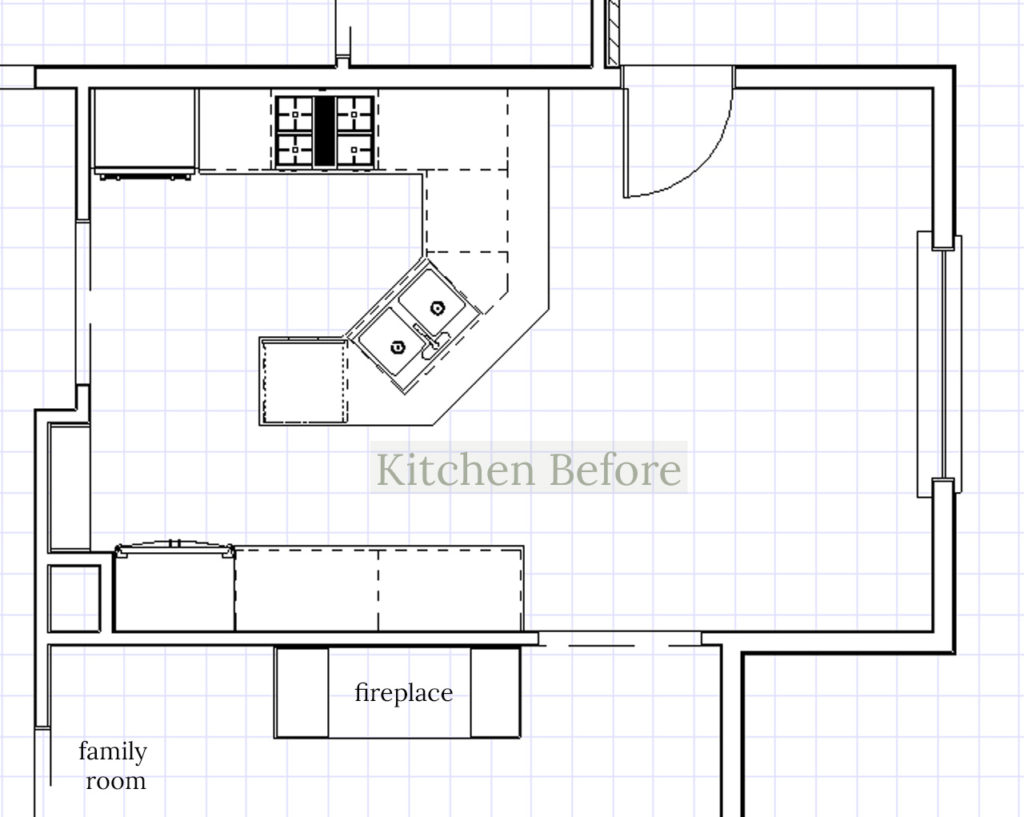
The Before

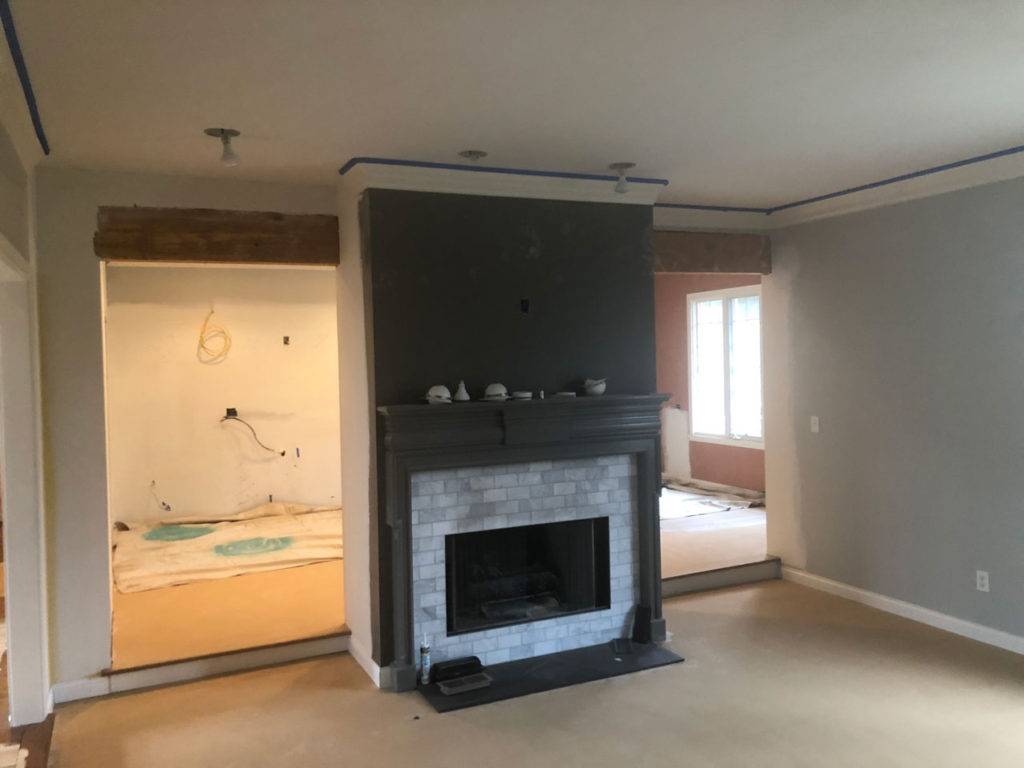
The kitchen and family room are separated by the fireplace, which is in the center of our main floor. This is such a different feature, and something I really wanted to highlight. In order to do this I decided to open up the existing opening on one side of the fireplace to feel less like a door way. There is a duplicate opening that was added on the other side, where the original refrigerator sits in these images. The original kitchen flow was very choppy, with a peninsula that cut the space in half. Despite a large east facing window, the sunlight was sparse and it felt dark, small, and isolated from the remaining and fairly open main floor. The combination of yellow quartz counters, honey oak cabinets, blue pattern floor tile, a brown backsplash, and an orange wall were definitely not helping the eyes.

The Plan
In order to keep the budget in check we prioritized what we most wanted for the space.
- Making structural changes to open the kitchen to the family room to improve flow and natural light
- Refinishing existing white oak floors and adding the same flooring to the kitchen and previously carpeted family room
- A Kitchen island that my family and guests can gather around
This meant compromising on these things so that we could save money.
- Not changing the large window in the “breakfast room” side of the kitchen to accommodate another wall of counter
- Reusing appliances that were still functional – we kept the wall oven/ microwave combination and dishwasher
- Finding a budget friendly option for our kitchen cabinets – which is where Ikea comes in
- DIY-ing where we could by:
- Building our Ikea cabinets
- Installing the cabinets and hardware
- Building the kitchen island and bench seat
- Painting walls and ceiling ourselves
- Painting and installing baseboards and trim ourselves
- Building and staining all of the shelving ourselves
First, the major architectural changes had to be made. We hired a contractor to install two beams to widen the existing doorway on the right side of the fireplace and to create another opening on the closed, left side. This work also included adjusting all the lighting, electrical, plumbing rough-ins, and drywall for the walls and ceilings. The contractors also did 1/2 of the demo work because we were tight on time to get it done. Allowing them to do the demo expedited the schedule and saved us from renting a dumpster. We have demo-ed a lot of spaces for renovation, and to be honest, this was a nice treat for ourselves.
Simultaneously we had the white oak flooring being installed throughout. The main floor had existing 2.25″ white oak throughout the entry, back hallway, office, and dinning room. The kitchen was tile, and the step down family room was carpeted. Our flooring installer did an excellent job feathering in the existing wood with the new that we extended to the kitchen and family room. He then refinished/ finished with a custom stain (Minwax) and a matte sealer. I wanted something that felt timeless, but also light. This stain accomplished giving me neutral undertone that did not read pink or orange. I love how they feel in contrast to our white walls and cabinets.

We did all of the painting ourselves. By we I mean my husband and his mom. Because I was pregnant I avoided painting for the most part. This was so hard on me, because usually painting is my job on a renovation! The walls are Benjamin Moore White Dove. The backside of fireplace (wall behind the island seating) is Sherwin Williams Anew Gray, the same color as the exterior door. The kitchen island was color-matched to the Semihandmade cabinet doors in the light gray color. This is very similar to Sherwin Williams Keystone Gray. All of the trim was color-matched to the Semihandmade supermatte white cabinet doors.
After

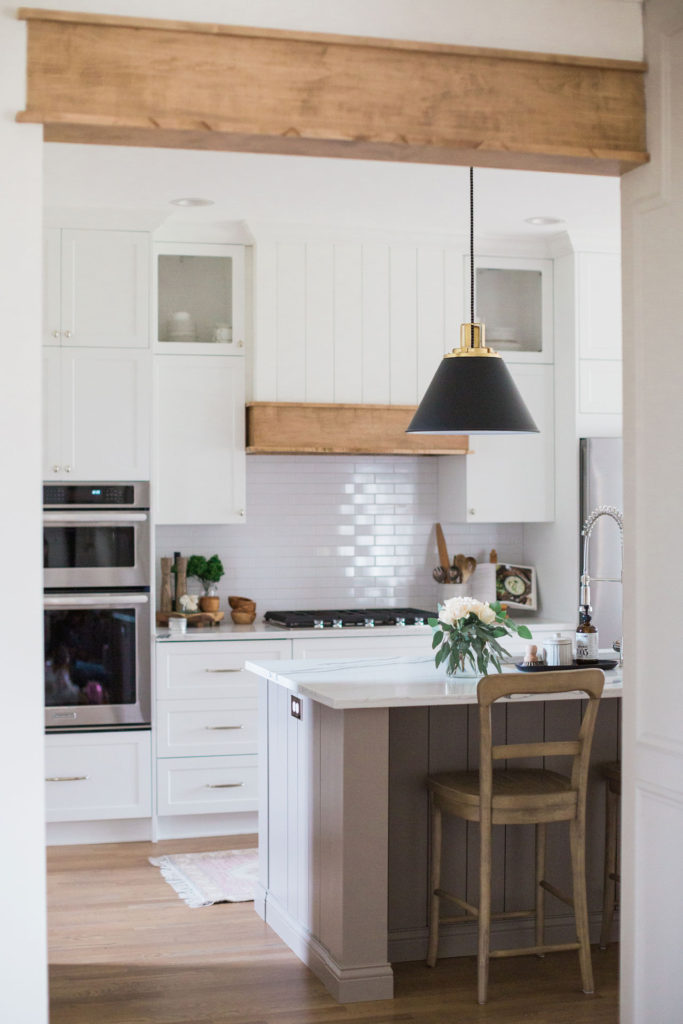
Once all of the contracted work was complete we installed our cabinets. To be honest, I knew before we even bought this house that I wanted to purchase a home that I could install an Ikea kitchen in. For years, every time I was in an Ikea store, I would spend too much time perusing the kitchen section and admiring all of the creative solutions their system had to offer. This obsession led me to daydreaming about trying my hand at using the ikea sektion cabinets in a custom way in a higher-end setting. I am a huge nerd for the customization, the price point, and the endless organizing options they offer. I decided to use the Semihandmade supermatte white shaker pre-finished doors on the perimeter and the the supermatte light grey on the island. My husband built the island frame that surrounded the cabinets and dishwasher, check out this post for more details on that.

Next, we had the countertops installed. We began going to local suppliers during the downtime we had while waiting for the cabinets to be delivered. This gave me time to find exactly what I was looking for. I knew I wanted to go with quartz because have young kids so durability was a priority. A lot of time was spent searching for a quartz that gave the look of marble, which would have been my choice had my future sanity not been involved. I am not a fan of materials that are trying to look like another material to start with, like wood-look tile or marble-look quartz, unless they are done really well. So I searched everywhere for something that had the depth, natural veining, and low gloss finish that real marble countertops would have. The quartz I chose is the Vadara Bianco Molasa (sourced locally here) because it has an almost crystal-like transparency in the veins which mimics that depth of true marble. A lot of the quartz products I looked at felt like the veins were painted or printed onto the surface making them feel very opaque. It also had a lot of variation in the coloring, containing both a cooler and warmer grey in the veins. The finish is not a true “honed” finish, but it is a very low gloss surface compared to many other quartz products I looked at.

After the counters were installed, we finished up with all of the detail work. I chose a simple 2″ x 8″ white subway tile for the backsplash with a white grout. Because our countertops had a bold vein in them, I didn’t want to compete with that by making a statement in the tile. I loved the longer line of this tile to help keep the backsplash from becoming too busy.

pendant lights | perimeter cabinets shaker in supermatte white | island cabinets shaker in supermatte light grey | cabinet hardware (polished nickel) | barstools | backsplash tile | semi-flush mount light | bench pillows | Sink Faucet | Bouquet Artwork | countertops | brass sconces
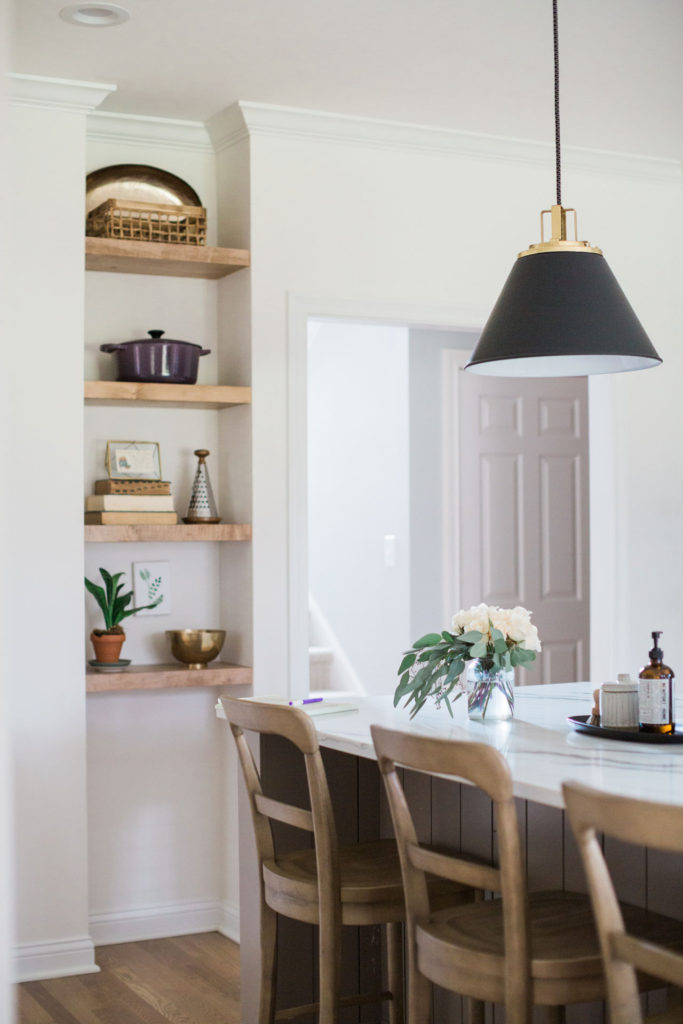
Next came all of the the lighting selections. I picked out these black island pendants first, knowing they would be another statement item. They balance the bold veins on the quartz slab below them. These lights are visible around both sides of the fireplace, so they needed to have a larger scale so they did not disappear in the space. For over the open shelves I picked the brass articulating sconces and the price point was great. Over the bench seat area I chose the white linen and black semi- flush mount. I wanted something that was understated and complimented the pendants but didn’t compete or distract from them. Eventually I will add a small 24-30″ breakfast table to this spot and this light will center over it.
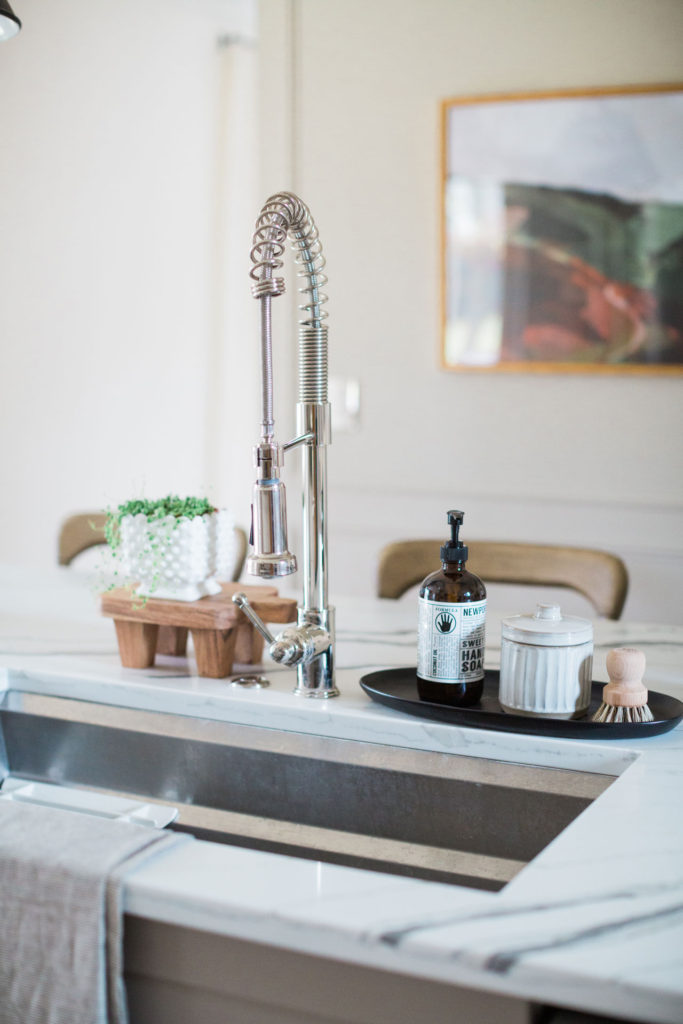
island cabinets shaker in supermatte light grey | cabinet hardware (polished nickel) | barstools | Sink Faucet | Hills II Artwork | Artwork Framing | sink
I wanted a balance between polished nickel, brass, and black among the metal finishes in our kitchen. In my opinion, mixing metals, when they balance and compliment one another, gives more visual interest to a space. Polished nickel is repeated in the cabinet hardware, faucet, exterior door hardware, and on the prominent light switches in the room. This finish felt traditional and timeless, and I love the simplicity of the pulls and knobs. Finding polished nickel hardware that came in a variety of handle lengths was a bit challenging but key to the placement. Having a pull down faucet was a must have, especially with the large single basin sink. The traditional details on this one combined with the modern interest from the exposed spring makes the faucet a decorative element in the space. Signature Hardware is my go-to source for good looking, quality, and affordable faucets.
I spent SO MUCH TIME deciding on what kind of sink to use. Did I want an apron sink? Would I regret a single basin sink because I would have to use our limited island counter space for dish drying? Ultimately I found the perfect solution in this single basin stainless under mount sink. It has small ledges at 3 different levels to allow for attachments like drying racks, a separate basin container, or a strainer container to be rearranged inside to divide up the function of the sink. It’s a genius design, and one of my favorite functional features in the space.
pendant lights | perimeter cabinets shaker in supermatte white | island cabinets shaker in supermatte light grey | cabinet hardware (polished nickel) | barstools | backsplash tile | semi-flush mount light | bench pillows | Sink Faucet | Hills II Artwork | Artwork Framing | Runner | Bouquet Artwork| outlet and switch cover plates (polished nickel) | sink
We built all of the floating shelving ourselves to help save money and to get the specific look we wanted. I am so happy with the overall look. We hired a finish carpenter to continue the room’s existing crown across the wall of upper cabinets to have a more traditional finish to them. He also built the vent hood surround for us, which I detailed in this post.
pendant lights | perimeter cabinets shaker in supermatte white | island cabinets shaker in supermatte light grey | cabinet hardware (polished nickel) | barstools | backsplash tile | semi-flush mount light | bench pillows | Sink Faucet | Hills II Artwork | Artwork Framing | Runner | Bouquet Artwork| outlet and switch cover plates (polished nickel)
Ok that is ALOT of talk about a kitchen, but I hope you found some of this helpful! If you are looking for sources for anything not linked check my Home Sources page or send me a message on my Instagram (@housewithhome). I leave you with a few more images for you to enjoy. Thanks for all of your compliments and questions on how we did this renovation, it truly makes me so happy!


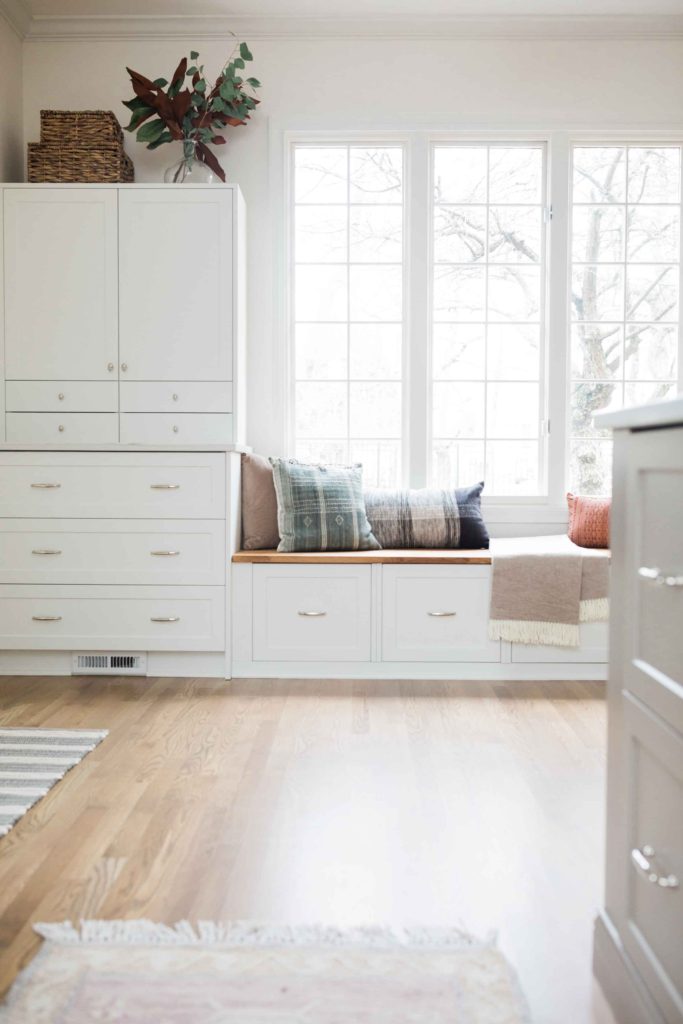


How much does an Ikea Cabinet Bench Seat Cost?
I talk in depth about understating the pricing for Ikea Kitchen Cabinets in my post “How much does an Ikea Kitchen Really Cost?”. This information will be helpful if you are trying to determine is this is an affordable option with out going through the effort to fully design and estimate the cost off your item list.

Thanks for posting your experience! Your project is so similar to what my husband and I are hoping to do to our new house. Will you be doing a budget breakdown post? I would love to know how you came up with an overall budget, how the project broke down by category and if you were able to stay on track. The beautiful finishes and your incredible design skills are inspiring, but it’s always hard as an aspirational DIYer to know if these projects are even feasible with our budget. Can’t wait to continue following along on your blog!!
Hi Gina,
I am so glad you found this helpful. I am sure your new project is very exciting for you! I know exactly what you are saying about having the budget available to help followers understand if achieving this look is attainable for them, or how they can adjust this inspiration to meet their budget. I do plan to share a budget breakdown post very soon!